论坛里目前提供的解锁AX6的ssh的方法大都需要另外找一台openwrt的路由器,不过观察给openwrt路由器用的脚本后发现,理论上只需要能运行一个支持POST的api server和能开热点的Linux机器,就能解锁SSH了。如果身边有带Wi-Fi,且运行Linux的电脑(开发板树莓派都行),可以省去了专门找一台openwrt路由器或者安装虚拟机的麻烦。(本质上是开一个接受POST的api server)小弟不太会Discuz的排版,本帖看起来可能比较乱,下文的内容和自己博客里的同名文章是基本一致的 https://sparktour.me/2022/03/18/enable-redmi-ssh-without-openwrt/ 博客里的排版略微正常一些。准备- 一台能够开Wi-Fi热点(AP),且能够配置静态IP的设备。(笔者使用了安装Ubuntu的树莓派开热点,理论上Linux虚拟机+能够开热点的无线网卡或者Windows电脑直接开热点都能达到类似的效果)。
- 设备上需要能运行web服务器(笔者用的nginx),或者能运行python(能监听本地端口即可)
- 未解锁的红米AX6路由器。
- (可选)随便找台路由器,让操作的电脑,AX6和树莓派处在同一内网内方便ssh操作。
[color=var(--link-color)] [size=0.875em][color=var(--link-color)]接线拓扑图
启用树莓派的热点参考其他作者写的在openwrt上运行的脚本([color=var(--link-color)]Github Link),解锁所需的操作可被简化为设置一个静态IP,网关为169.254.31.1的无线网络,同时在网关上开一个接受POST的api server,路径为/cgi-bin/luci/api/xqsystem/token。 这一步只要做到开启热点和配置静态IP即可。配置静态IP的软件与Linux的发行版有关,笔者的树莓派使用的是netplan。具体步骤可请参考自己的Linux使用的网络配置软件。
使用hostapd配置热点(如果使用的是外接网卡,可自行解决驱动等问题) 首先安装hostapd:
建立热点配置文件 /etc/hostapd/hostapd.conf (这里使用的SSID为xiaomirouterssh,密码为xiaomi12345,可自行修改: | - interface=wlan0
- driver=nl80211
- ssid=xiaomirouterssh
- hw_mode=g
- channel=7
- wmm_enabled=0
- macaddr_acl=0
- auth_algs=1
- ignore_broadcast_ssid=0
- wpa=2
- wpa_passphrase=xiaomi12345
- wpa_key_mgmt=WPA-PSK
- wpa_pairwise=TKIP
- rsn_pairwise=CCMP
|
之后修改/etc/default/hostapd,在里面添加一行: 1
| DAEMON_CONF="/etc/hostapd/hostapd.conf"
|
之后启动使用hostpad开的热点: 1
2
| systemctl unmask hostapd
systemctl start hostapd
|
配置静态IP笔者的树莓派使用的网络配置软件为netplan。 修改/etc/netplan/50-cloud-init.yaml,加一个wlan0的接口,配置静态IP为169.254.31.1/24: 1
2
3
4
5
6
7
8
9
10
| network:
ethernets:
eth0:
dhcp4: true
optional: true
wlan0:
dhcp4: no
addresses:
- 169.254.31.1/24
version: 2
|
- network:
- ethernets:
- eth0:
- dhcp4: true
- optional: true
- wlan0:
- dhcp4: no
- addresses:
- - 169.254.31.1/24
- version: 2
(discuz上的代码块似乎吧缩进弄没了,编辑的时候需要注意缩进) 之后使用netplan generate 50-cloud-init.yaml && netplan apply应用配置。 配置树莓派上的api server方法1:nginx参考配置文件如下: 1
2
3
4
5
6
7
8
9
10
11
12
13
14
15
| server {
listen 80 default_server;
listen [::]:80 default_server;
location /cgi-bin/luci/api/xqsystem/token {
if ($request_method != POST) { return 404; }
return 405;
error_page 405 =200 /test/response.json;
}
location = /test/response.json {
root /opt;
}
} |
- server {
- listen 80 default_server;
- listen [::]:80 default_server;
- location /cgi-bin/luci/api/xqsystem/token {
- if ($request_method != POST) { return 404; }
- return 405;
- error_page 405 =200 /test/response.json;
- }
- location = /test/response.json {
- root /opt;
- }
- }
同时将解锁用的payload放在/opt/test/response.json下: 1
| {"token":"; nvram set ssh_en=1; nvram set uart_en=1; nvram set boot_wait=on; nvram commit; uci set wireless.@wifi-iface[0].key=`mkxqimage -I`; uci commit; sed -i 's/channel=.*/channel=\"debug\"/g' /etc/init.d/dropbear; /etc/init.d/dropbear start;","code":0}
|
- {"token":"; nvram set ssh_en=1; nvram set uart_en=1; nvram set boot_wait=on; nvram commit; uci set wireless.@wifi-iface[0].key=`mkxqimage -I`; uci commit; sed -i 's/channel=.*/channel="debug"/g' /etc/init.d/dropbear; /etc/init.d/dropbear start;","code":0}
先保证系统内安装了flask,requests,json这几个包。 并运行下面的python脚本: 1
2
3
4
5
6
7
8
9
10
11
12
13
| # app.py
from flask import Flask, request, jsonify
app = Flask(__name__)
payload = {"token":"; nvram set ssh_en=1; nvram set uart_en=1; nvram set boot_wait=on; nvram commit; uci set wireless.@wifi-iface[0].key=`mkxqimage -I`; uci commit; sed -i 's/channel=.*/channel=\"debug\"/g' /etc/init.d/dropbear; /etc/init.d/dropbear start;","code":0}
@app.post("/cgi-bin/luci/api/xqsystem/token")
def return_payload():
return payload, 200
if __name__ == '__main__':
app.run(host='169.254.31.1', port=80)
|
- # app.py
- from flask import Flask, request, jsonify
- app = Flask(__name__)
- payload = {"token":"; nvram set ssh_en=1; nvram set uart_en=1; nvram set boot_wait=on; nvram commit; uci set wireless.@wifi-iface[0].key=`mkxqimage -I`; uci commit; sed -i 's/channel=.*/channel="debug"/g' /etc/init.d/dropbear; /etc/init.d/dropbear start;","code":0}
- @app.post("/cgi-bin/luci/api/xqsystem/token")
- def return_payload():
- return payload, 200
- if __name__ == '__main__':
- app.run(host='169.254.31.1', port=80)
如果运行成功,可以看到: 1
2
3
4
5
6
7
8
| * Serving Flask app 'app' (lazy loading)
* Environment: production
WARNING: This is a development server. Do not use it in a production deployment.
Use a production WSGI server instead.
* Debug mode: off
* Running on all addresses.
WARNING: This is a development server. Do not use it in a production deployment.
* Running on http://169.254.31.1/ (Press CTRL+C to quit)
|
这样的log,这时可以用curl确认一下运行的正不正常(如果返回了上方payload中的那个json就是正常的): [color=var(--highlight-foreground)]
[color=var(--highlight-foreground)]
随后参考其他人写的解锁教程即可比如 https://www.right.com.cn/forum/thread-4125639-1-1.html 或者 https://github.com/shell-script/unlock-redmi-ax3000 里的教程,我在下面也引用了一下Github里的教程。
解锁SSH这部分写的比较简单,如果有不清楚的地方可以参考[color=var(--link-color)]这篇文章: 首先,登入AX6的后台,找到url里的STOCK 然后 依次 访问下面的 URL(STOK 不含尖括号): 1
| http://192.168.31.1/cgi-bin/luci/;stok=<STOK>/api/misystem/extendwifi_connect?ssid=xiaomirouterssh&password=xiaomi12345
|
[color=var(--link-color)] 如出现 connect success 则代表路由 B 已成功连接到路由 A,可以继续访问下一个 URL: 1
| http://192.168.31.1/cgi-bin/luci/;stok=<STOK>/api/xqsystem/oneclick_get_remote_token?username=xxx&password=xxx&nonce=xxx
|
如出现下图中的内容,则代表 SSH 开启成功
[color=var(--link-color)] 至此就可以衔接其他作者写的刷机教程了。 固化SSH(可选)引用[color=var(--link-color)]这篇文章里的操作:
然后通过 SSH 连接,执行下列命令:
[color=var(--link-color)] 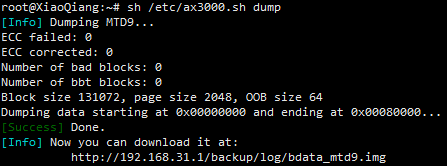
脚本会自动导出备份数据,请通过下面的地址保存以防万一:
1
| http://192.168.31.1/backup/log/bdata_mtd9.img
|
\5. 固化 Telnet/SSH 访问权限
默认情况下,当路由器恢复出厂设置或者升级后,相关权限将会丢失,因此我们需要额外的操作以保留它们
通过 SSH 连接路由 B,执行下面的命令: 1
2
3
| sh /etc/ax3000.sh unlock
路由器会自行重启,重启后执行
sh /etc/ax3000.sh hack
|
\6. 挂载 overlay 空间
方便安装各种软件包和你想要的一些功能
通过 SSH 连接路由 B,执行下面的命令: 1
2
3
| sh /etc/ax3000.sh mount
自行重启路由器,然后执行
sh /etc/ax3000.sh keep
|
\7. (可选)更换 dists 源
小米固件内的 dists 源已经非常老旧且不推荐使用,更换到最新源即可享受在线安装 xray-core 等权利
将路由 B 的 /etc/opkg/distfeeds.conf 文件更改为如下内容:
运行 opkg update 后即可愉快食用。
|  /1
/1 

 IP卡
IP卡 狗仔卡
狗仔卡 发表于 2022-3-18 16:33
 置顶卡
置顶卡 沉默卡
沉默卡 喧嚣卡
喧嚣卡 顶贴卡
顶贴卡 显身卡
显身卡